
Integrating with GitHub Actions – CI/CD pipeline to deploy a Web App to Amazon EC2
Project Objectives
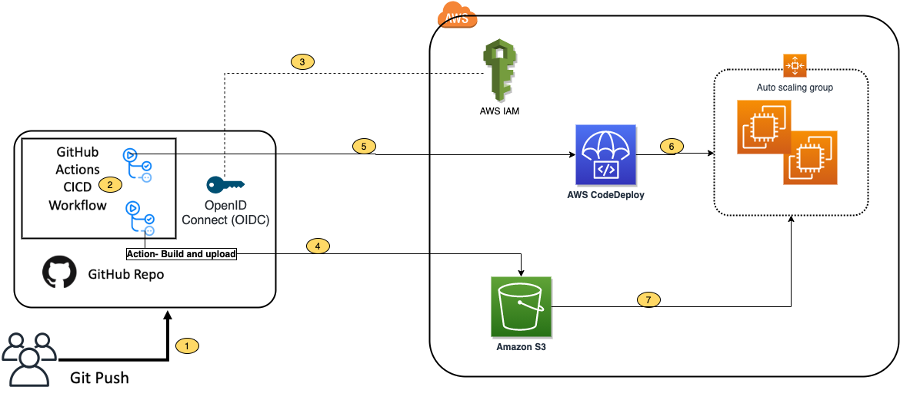
To utilise GitHub Actions to create a CI/CD workflow and AWS CodeDeploy to deploy a sample Java SpringBoot application to Amazon EC2 in an Autoscaling group.
Architecture overview.
This article presents an overview of the project, focusing on the distilled essence of the process. Within this article, I aim to convey key findings and relevant insights encountered during the course of my exploration with this project. If you want to follow the full process yourself then you can do so via the following link > https://aws.amazon.com/blogs/devops/integrating-with-github-actions-ci-cd-pipeline-to-deploy-a-web-app-to-amazon-ec2/
Prerequisites:
- A GitHub account
- Git installed and linked to your GitHub account (I generated an ssh key and added the token to GitHub and then authenticated via the command line). See here for further information > https://docs.github.com/en/authentication/connecting-to-github-with-ssh/adding-a-new-ssh-key-to-your-github-account
- Basic Linux command line knowledge. e.g. Navigate files and folders and hidden files and folders. Edit files from the terminal.
- An AWS Free Tier account - Make sure to clean up resources once the project is completed to avoid excessive charges.
Create repository on GitHub

Clone project source code to local folder and copy contents to local GitHub repo
$ git clone https://github.com/aws-samples/aws-codedeploy-github-actions-deployment.git
I have Git authenticated with my GitHub account using ssh. The ssh key was generated via the Linux command line and then the authentication key was added to GitHub some more information relating to this located at this URL >
Some tips
For checking GitHub access and which folders in your home folder for example have .git files in them and are therefore local Git repos. git status will also tell you the current status of the repo and if it synced to the GitHub repo, if there’s any commits ready to be pushed so it displays the state of the working directory and the staging area.
To test ssh access to GitHub run
$ ssh -T git@github.com

# Example output
Hi SuperNolvas! You've successfully
authenticated, but GitHub does not
provide shell access.
Find existing Git repos in a folder
$ find . -name ". git"

# Example output
./docker-fundamentals/.git
./GitActionsDeploytoAWS/.git
Deploy the CloudFormation Template
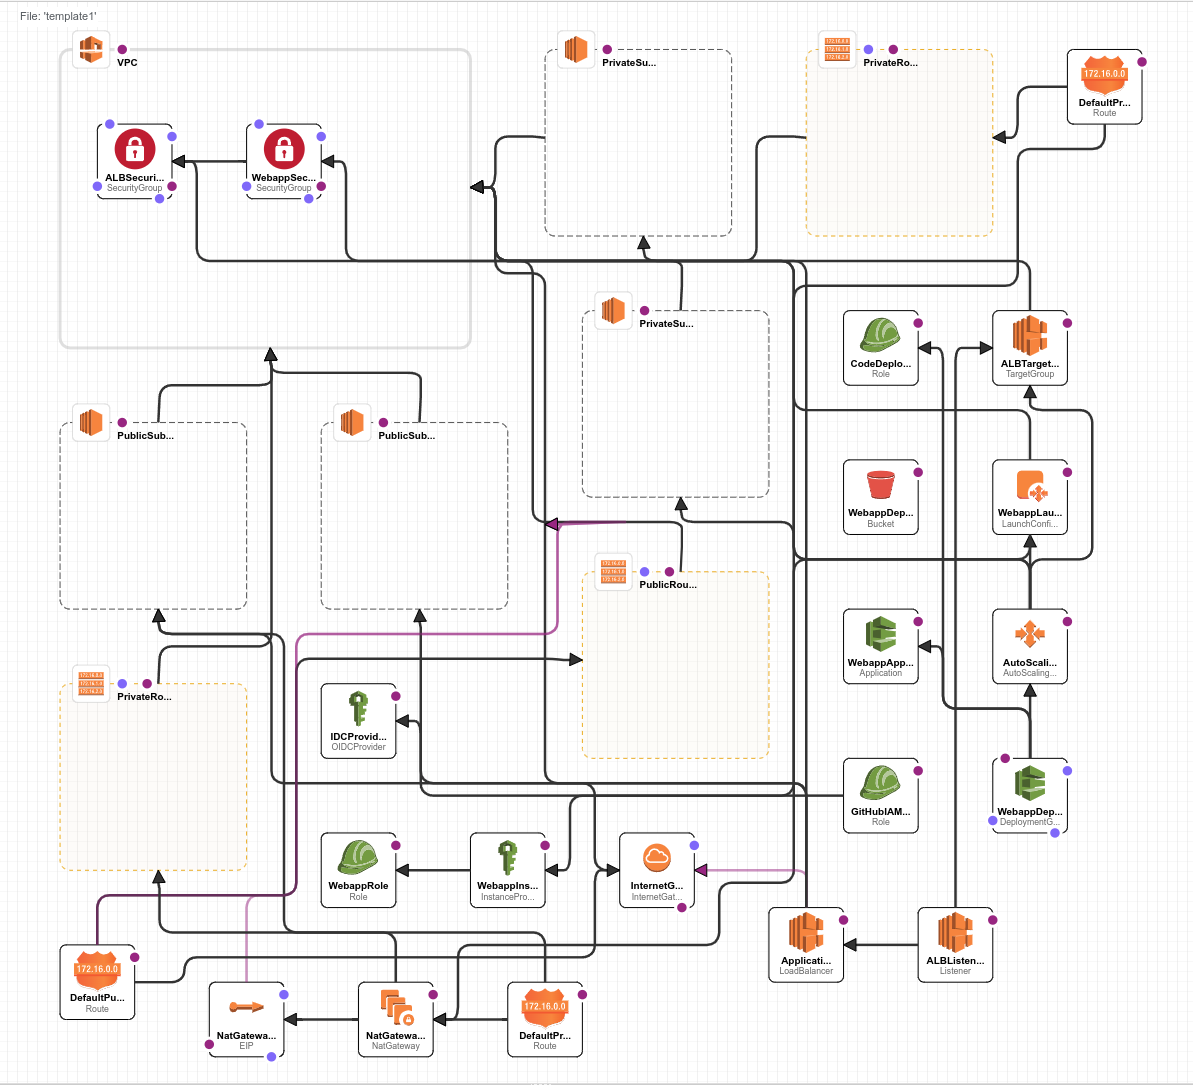
Using AWS CloudFormation create a stack and upload the template.yml file. This next part isn’t part of the tutorial but I noticed a link to open in designer so of course I had a look and the next screen shows the actual infrastructure architecture that will created from the template file.
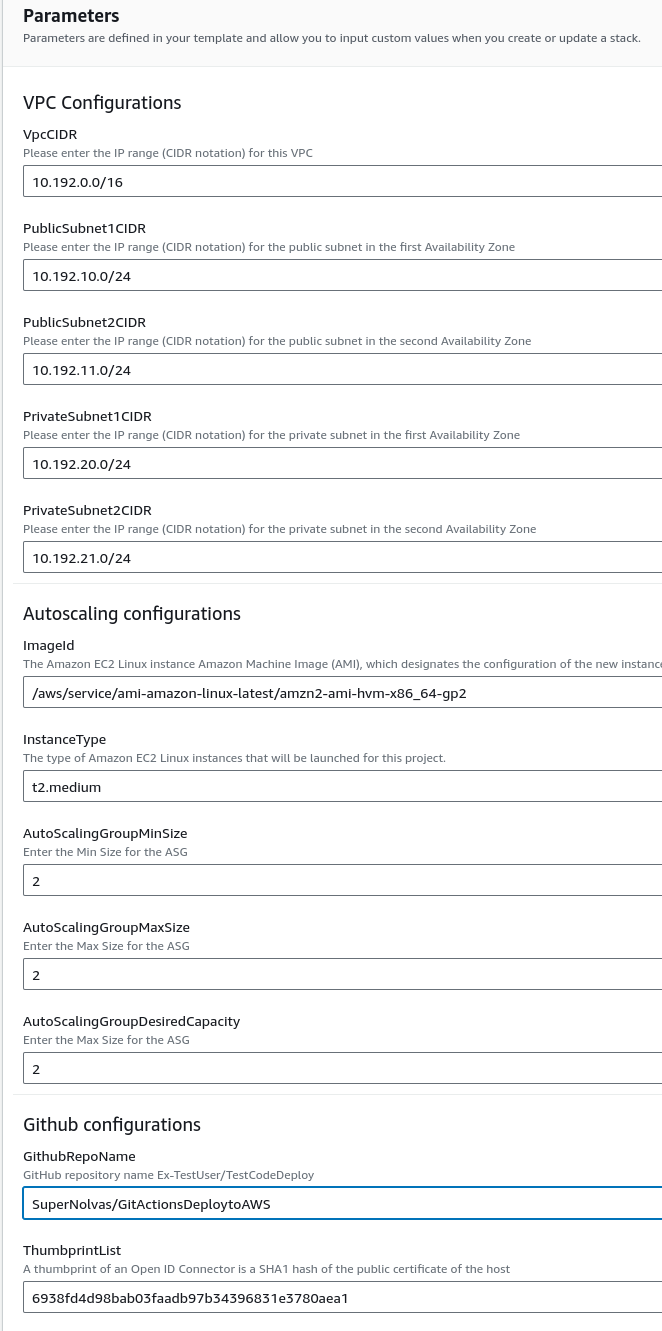
OK so now we have parameter summary (see image below) from the uploaded CloudFormation template. Lets go through this. So we have a VPC (Virtual Private Cloud) this VPC will contain our provisioned AWS resources. So we have a VPC with a /16 CIDR subnet this would give us a 255.255.0.0 subnet with a total host availability of 65535 hosts. Next we have 4 subnets defined, two are labelled as Public and two are labelled as Private. They all have a /24 CIDR and this gives each subnet a host availability of 256 hosts. It is IMPORTANT to note that naming these subnets Public and Private has no bearing on whether they are really Public or Private and this is actually defined by attached gateways e.g. IGW and NAT and the routing from these gateways to the respective subnets. So in this project the private subnets don’t have any Internet Gateway (IGW) routing.
We’re also selecting the EC2 compute instance type t2.medium, so the instance type is T2 and this instance has burstable performance so able to scale up its performance above its baseline performance. It has a modest specification of 2 vCPUs and 4GB RAM.
Autoscaling - When performance requirement exceeds a set threshold, this could be set by a CloudWatch alarm for example then more EC2 instances will be created. So in this case the set parameters are allowing for a maximum of 2 EC2 instances to be managed by an Autoscaling event.
Lastly we have the GitHub repository so I’ve added my personal repository and also we have the GitHub Actions ThumbprintList. I found an article here that describes why this value is used >
https://github.blog/changelog/2022-01-13-github-actions-update-on-oidc-based-deployments-to-aws/
This is to fix a problem renewing GitHub Actions SSL certificates due to an unexpected change in the intermediate certificate authority and relates to IAM OIDC which we will use later on in this project.
It will take CloudFormation approximately 10 minutes to create all of the resources. This stack will create the following resources.
- Two Amazon EC2 Linux instances with Tomcat server and CodeDeploy agent are installed
- Autoscaling group with Internet Application load balancer
- CodeDeploy application name and deployment group
- Amazon S3 bucket to store build artifacts
- Identity and Access Management (IAM) OIDC identity provider
- Instance profile for Amazon EC2
- Service role for CodeDeploy
- Security groups for ALB and Amazon EC2
Stack deployment progress >
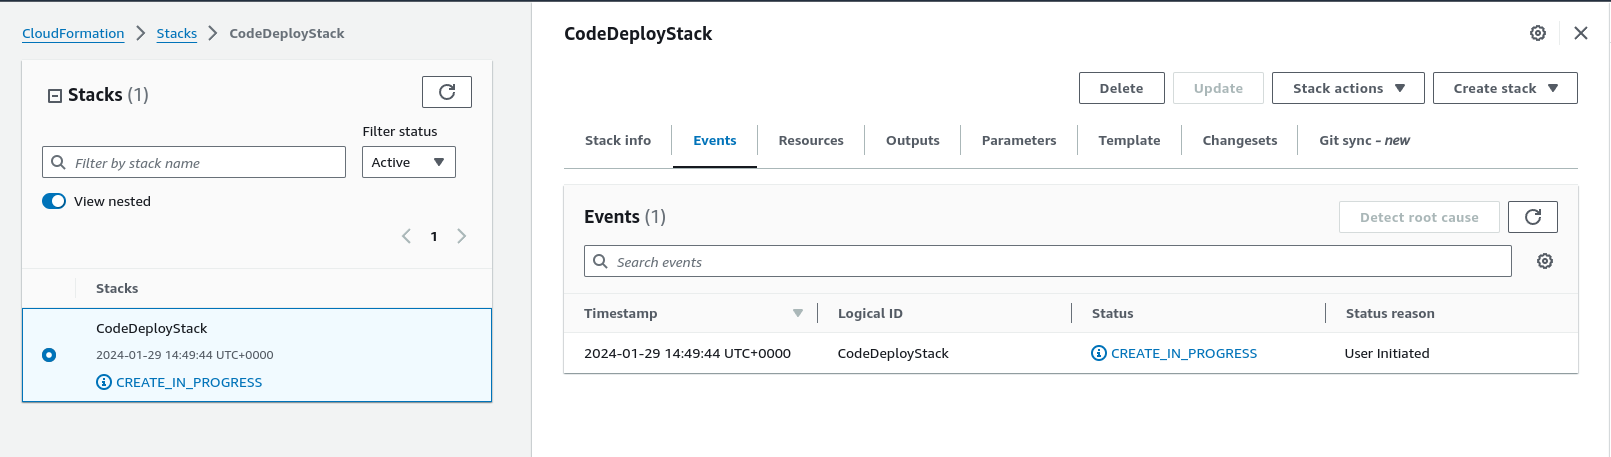
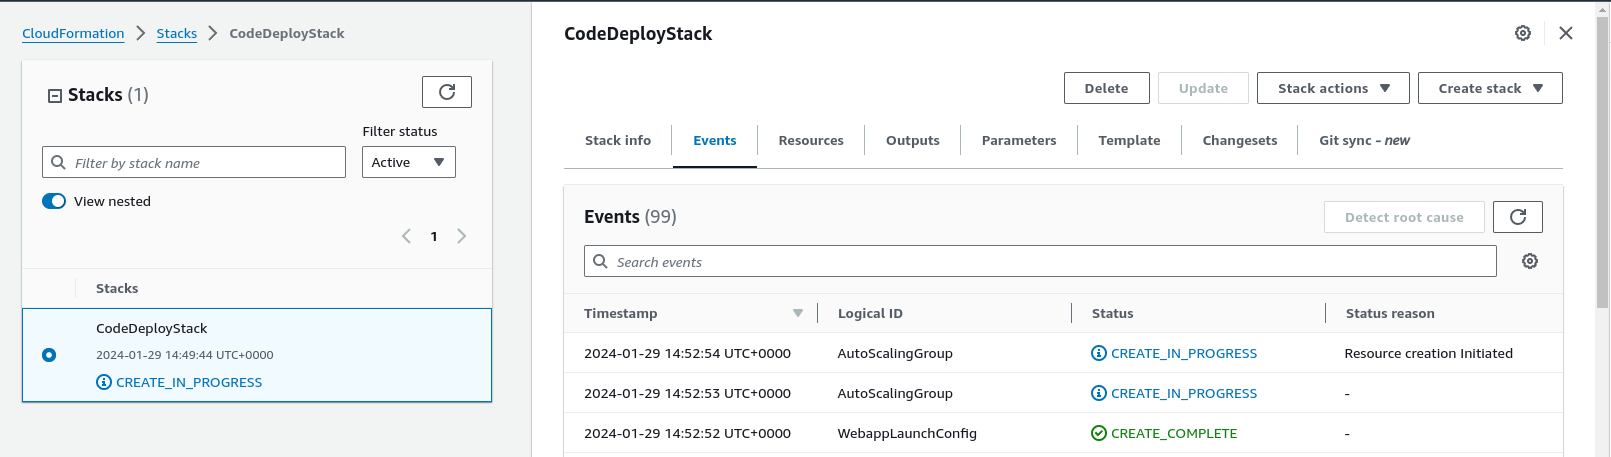
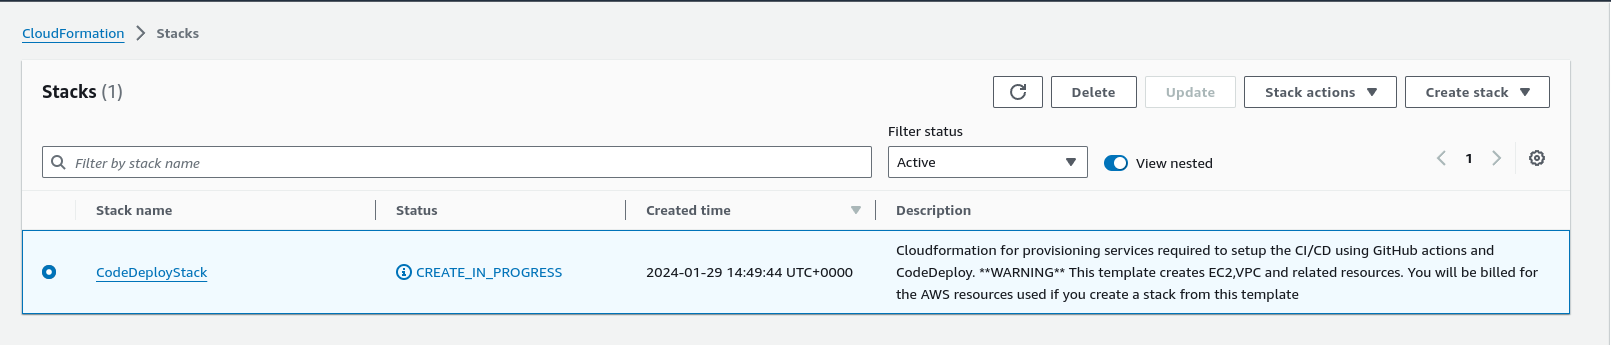
Going back one level on the ‘breadcrumb’ menu above we get a description of the process and also the overall status
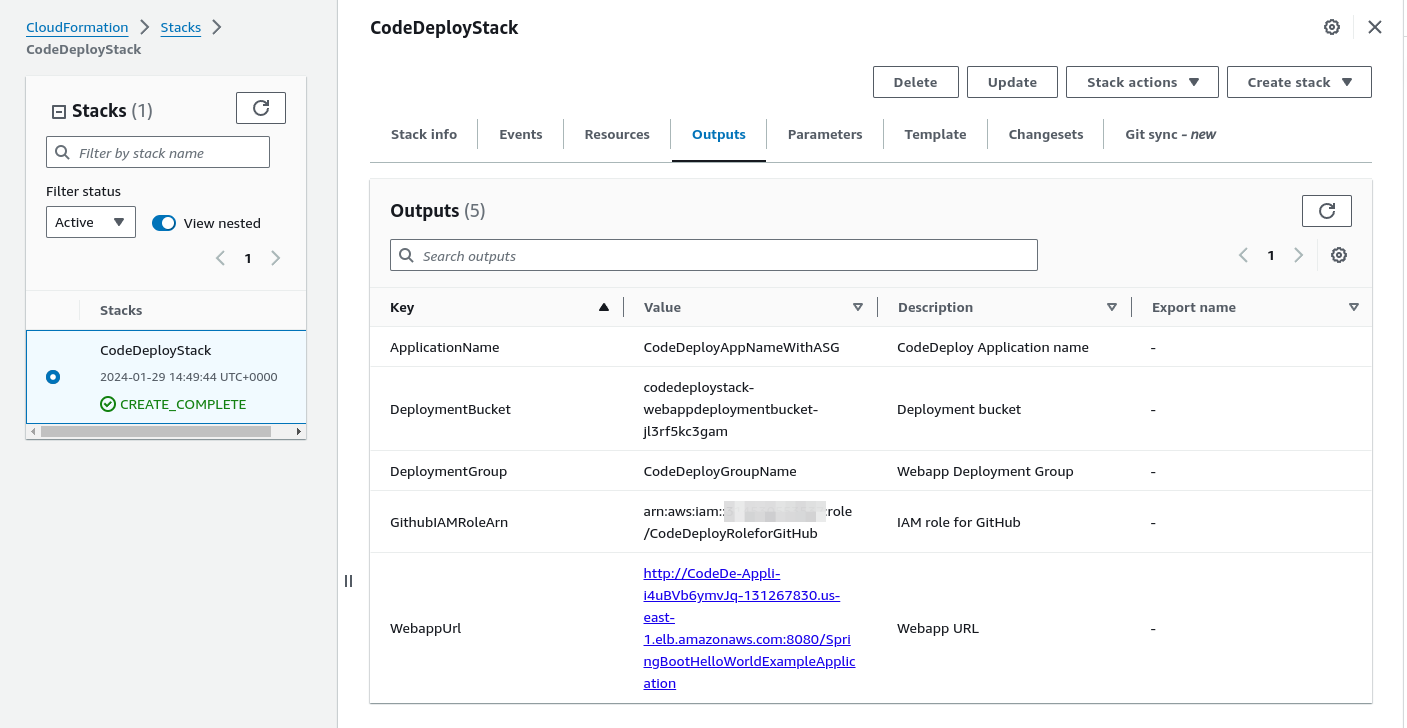
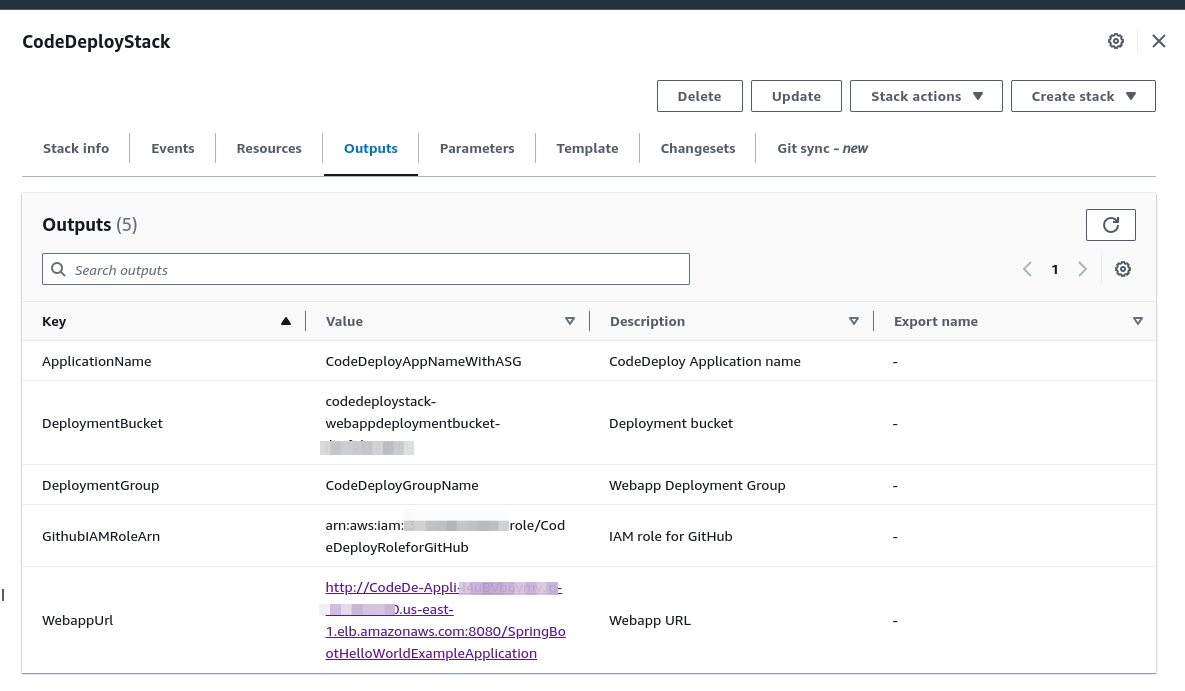
Now we can see that stack has been created successfully

Copy the S3 bucket name and also the IAM role ARN to a notes app / editor etc on your system. We’re going to use these to update our deploy.yml and after-install script files in the project root folder
Locate GITHUBREPO/.github/workflows/deploy.yml
This folder is your local folder and as this is a dotfile (.github) it will be hidden, but you can still navigate to this folder via the terminal. Here’s an example to find and edit the YAML file >
cd GitActionsDeploytoAWS/.github/workflows/
phil@pop-os:~/GitActionsDeploytoAWS/.github/workflows$

$ sudo nano deploy.yml
Now we need to edit two parameters in this deploy.yml file.
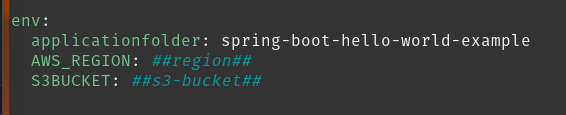
So for AWS_REGION I need to enter the region where we deployed the Cloudformation stack so us-east-1 and the S3BUCKET is the Deployment Bucket we copied from the Outputs tab in the Cloudformation console shown in a previous image. Once this is done save and exit this file.
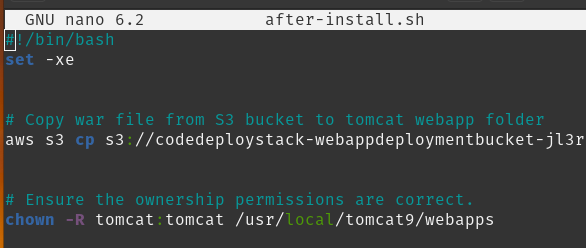
cd GitActionsDeploytoAWS/aws/scripts/
phil@pop-os:~/GitActionsDeploytoAWS/aws/scripts$

sudo nano after-install.sh
Enter the name of the s3 bucket overwriting the ##s3-bucket## portion of the path
Push changes to your GitHub repo
Make sure you’re inside the root folder of your project and verify this by running
$ git remote -v

#Expected Output

origin git@github.com:<username>/GitActionsDeploytoAWS.git (fetch)
origin git@github.com:<username>/GitActionsDeploytoAWS.git (push)
Next stage, commit and push changes to your GitHub repo
# Stage changes
git add .
# Make commit and describe commit with a message
git commit -m “Initial commit”
#Push the changes to the GitHub repo
git push
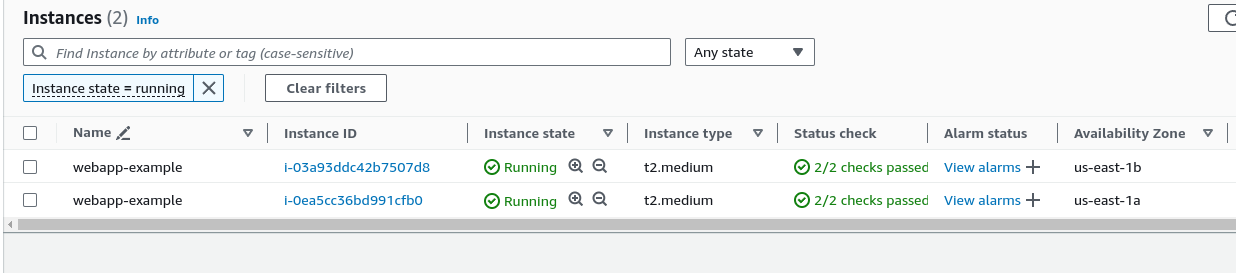
OK let’s understand where we are so far and have a look at some of the infrastructure created >
EC2 instances - Note these instances are deployed in two availability zones, which increases availability (High Availability) and resilience (Fault Tolerance).
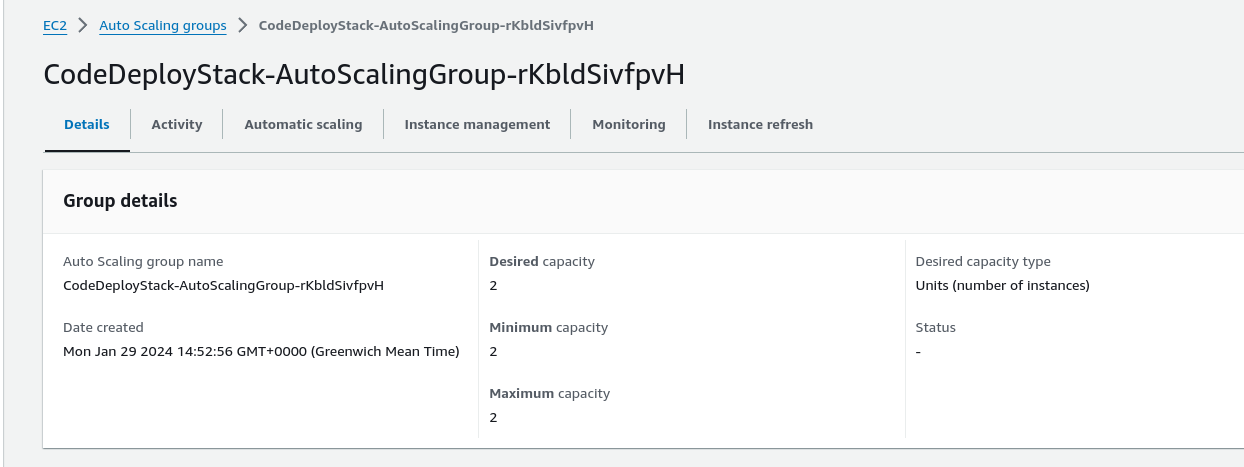
EC2 Autoscaling group
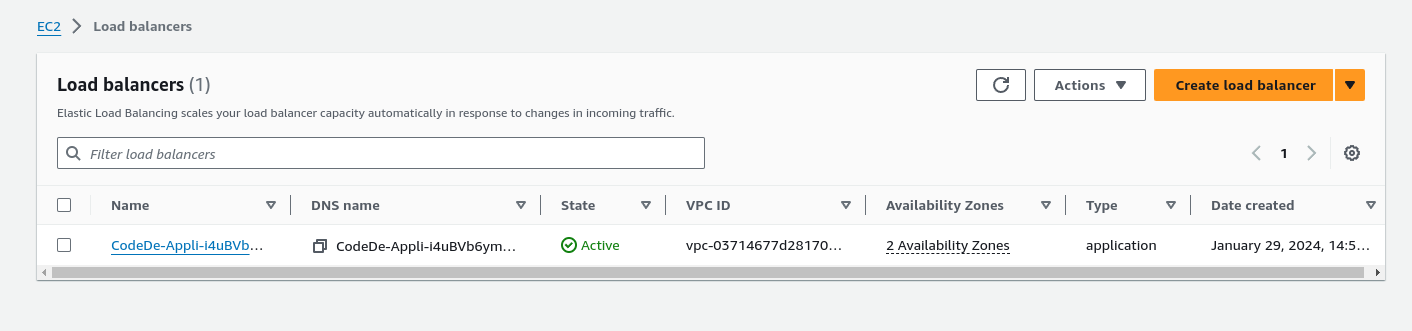
Application Load Balancer - OSI Model Layer 7 HTTP / HTTPS traffic. Allows more sophisticated content based routing
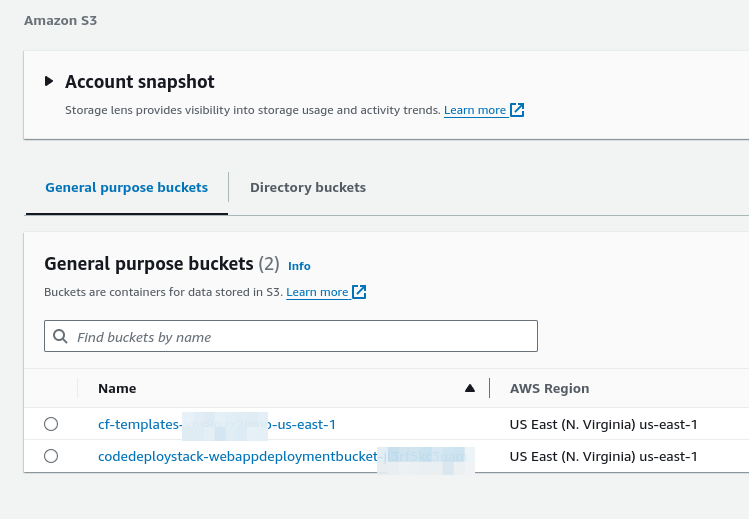
S3 Buckets
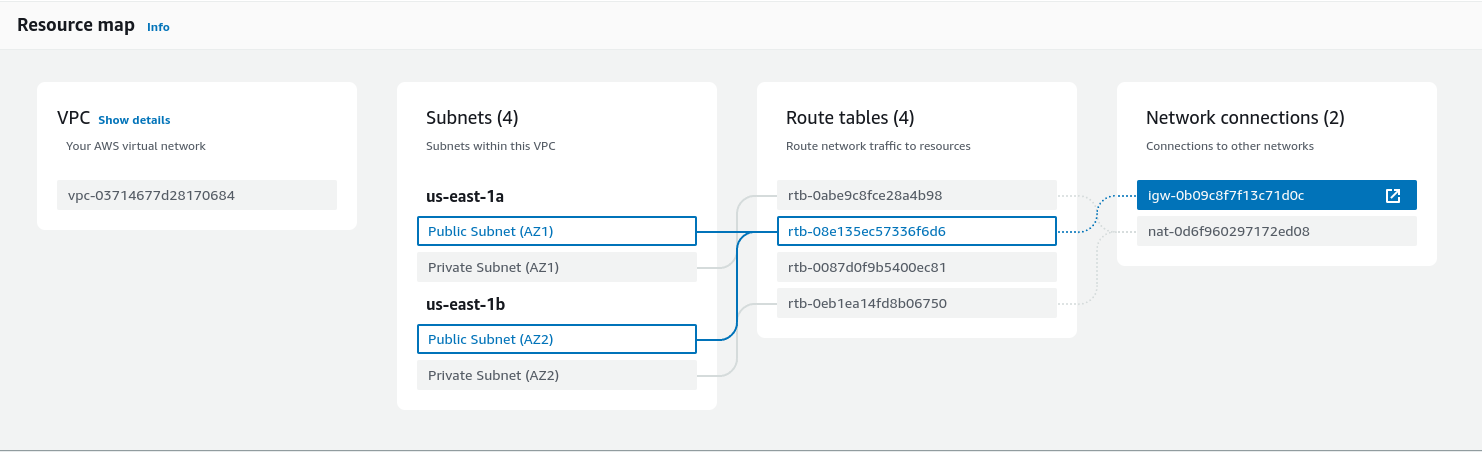
Next up let’s understand our VPC and Networking infrastructure. So looking at the VPC resource map, we can see that we have an Internet Gateway (IGW) connected to our two Public subnets and these two subnets are in two different Availability Zones (AZs) to increase availability for our public facing resources.
For our Private subnets we can see a NAT Gateway is routed to each of these.
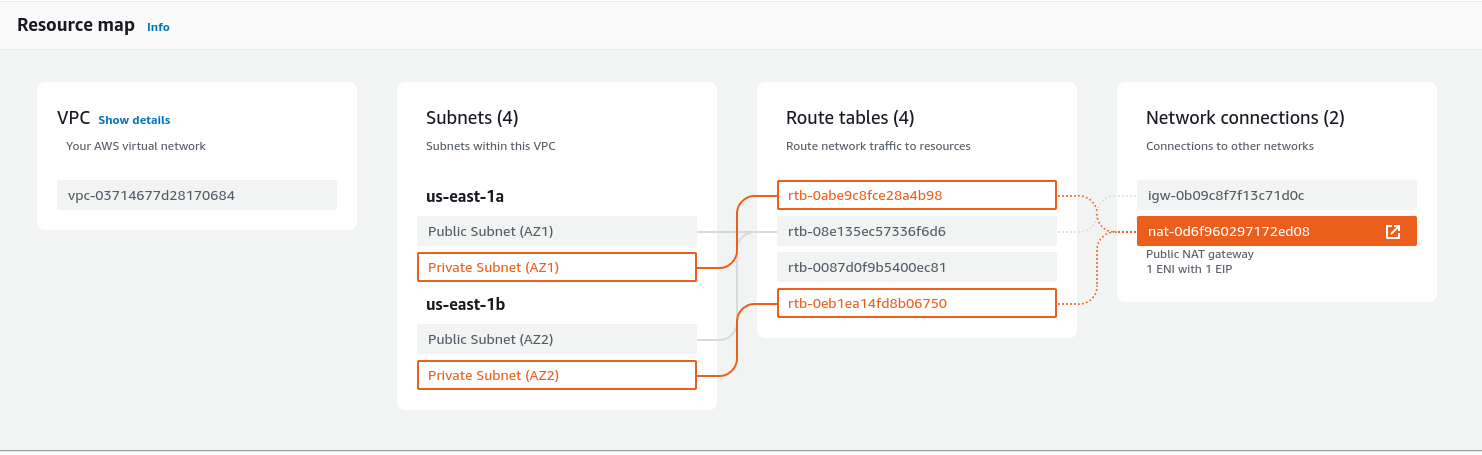
With regard to the NAT Gateway. Let’s look at what 1 ENI with 1 EIP refers to:
Let's break down the terms:
- ENI (Elastic Network Interface): An Elastic Network Interface is a virtual network interface that you can attach to an Amazon EC2 instance in a Virtual Private Cloud (VPC). In the context of a NAT Gateway, the ENI is essentially the network interface associated with the NAT Gateway.
- EIP (Elastic IP): An Elastic IP address is a static IPv4 address designed for dynamic cloud computing. When you associate an Elastic IP address with an instance or a NAT Gateway in this case, it provides a persistent public IP address that you can use to access your instance or, in the case of a NAT Gateway, to perform outbound communication with the internet.
So, "1 ENI with 1 EIP" means that the NAT Gateway is configured with a single Elastic Network Interface (ENI), and it is associated with one Elastic IP (EIP). This configuration allows the NAT Gateway to have a consistent public IP address (the EIP) for outbound communication to the internet. Instances in the private subnet can route their traffic through the NAT Gateway, which then uses its public IP address to communicate with external services on behalf of those instances.
Setup GitHub Secrets
Direct quote from the project setup >
The GitHub Actions workflows must access resources in your AWS account. Here we are using IAM OpenID Connect identity provider and IAM role with IAM policies to access CodeDeploy and Amazon S3 bucket. OIDC lets your GitHub Actions workflows access resources in AWS without needing to store the AWS credentials as long-lived GitHub secrets.

Link AWS CodeDeploy to GitHub
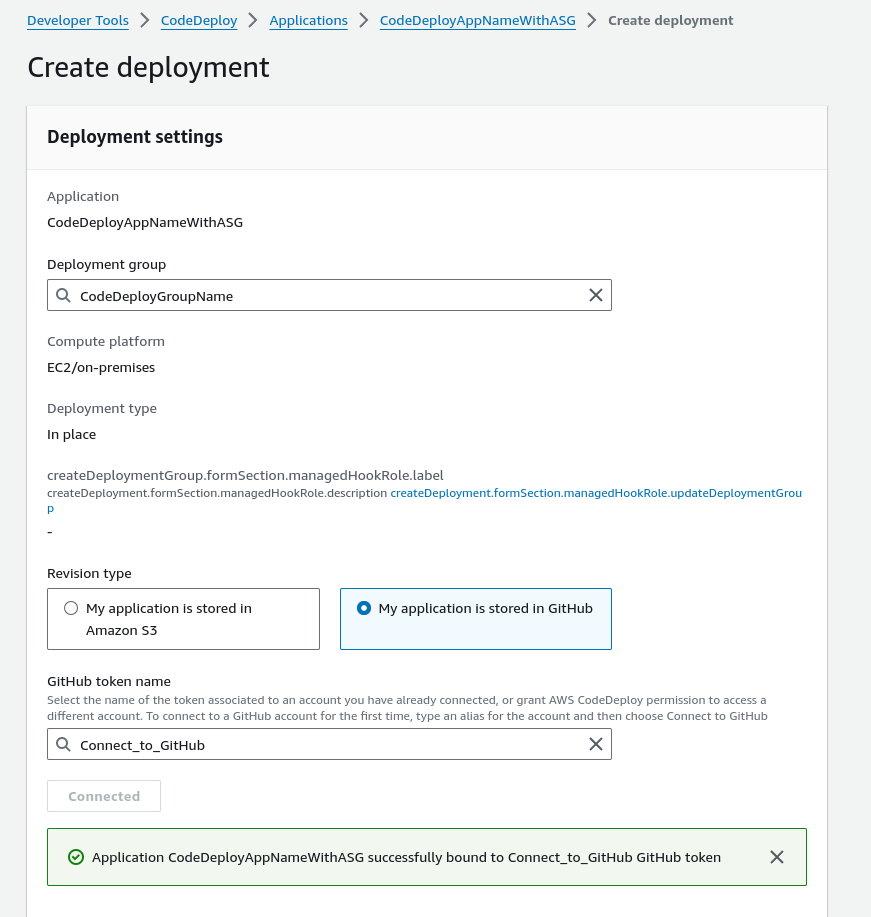
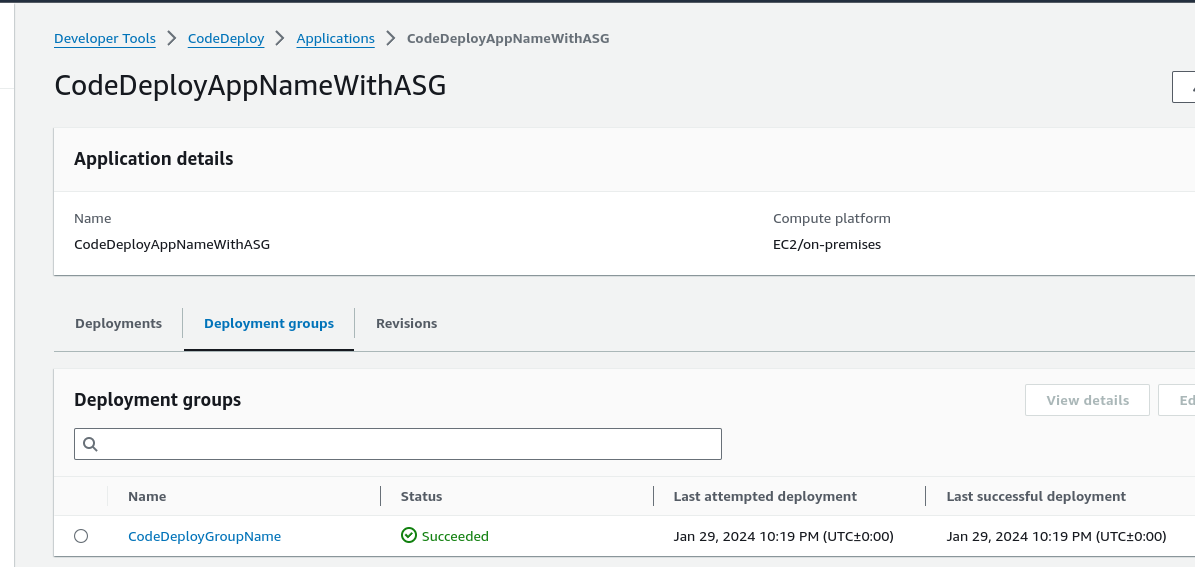
So we already have a CodeDeploy Application and Deployment Group setup via the CloudFormation template. Select the Application name and then Deployment Group and then Create Deployment. Type in a description for the GitHub Token Name, something that describes it adequately, I chose Connect_to_GitHub and then making sure I was signed out of GitHub I then clicked on Connect and then authorised CodeDeploy to link to my GitHub account.
CodeDeploy Application =CodeDeployAppNameWithASG
Deployment group = CodeDeployGroupName
Trigger the GitHub Actions Workflow
From the Actions menu in the repository, click on Build and Deploy, Run Workflow dropdown and then click on the green Run Workflow button, after a few minutes there will be a green check by Build and Deploy as shown in the screenshot below
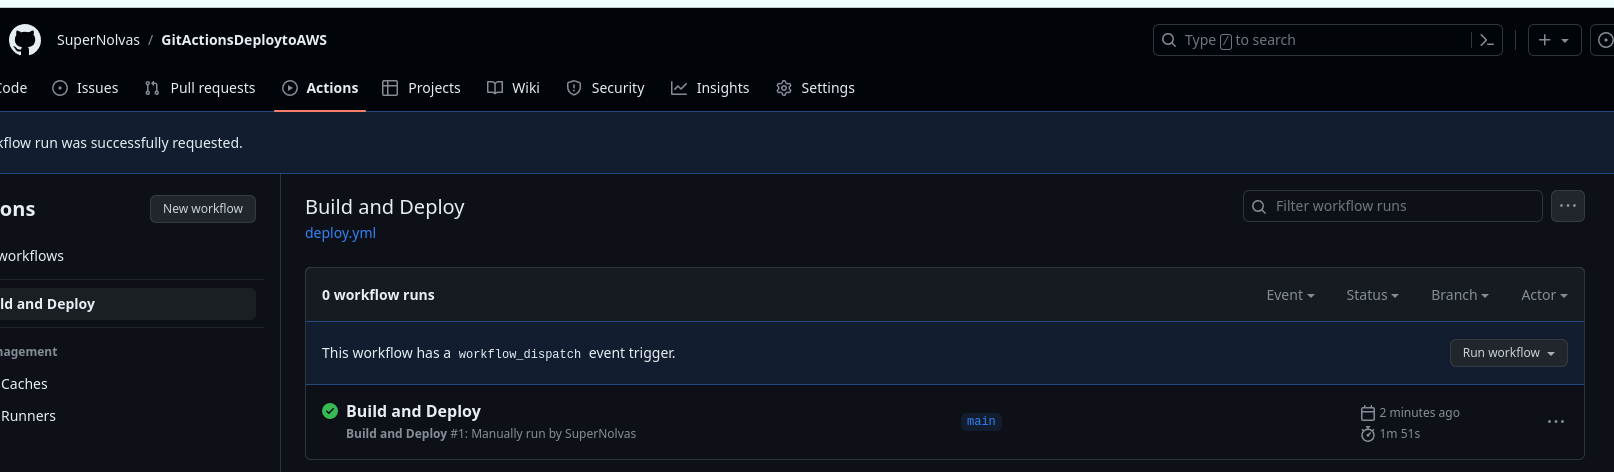
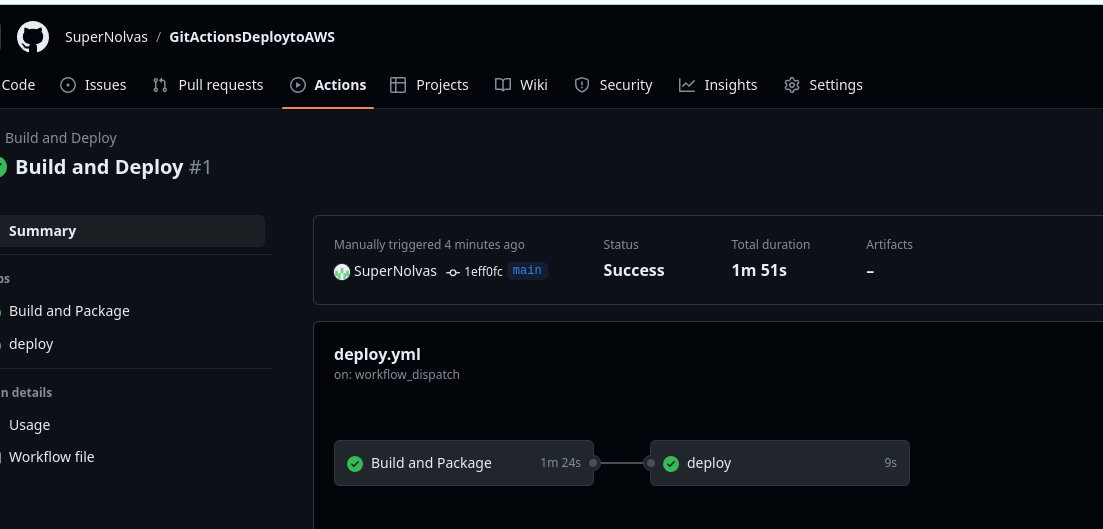
The Build and Package stage builds the sample SpringBoot application, generates the war file, and then uploads it to the Amazon S3 bucket.
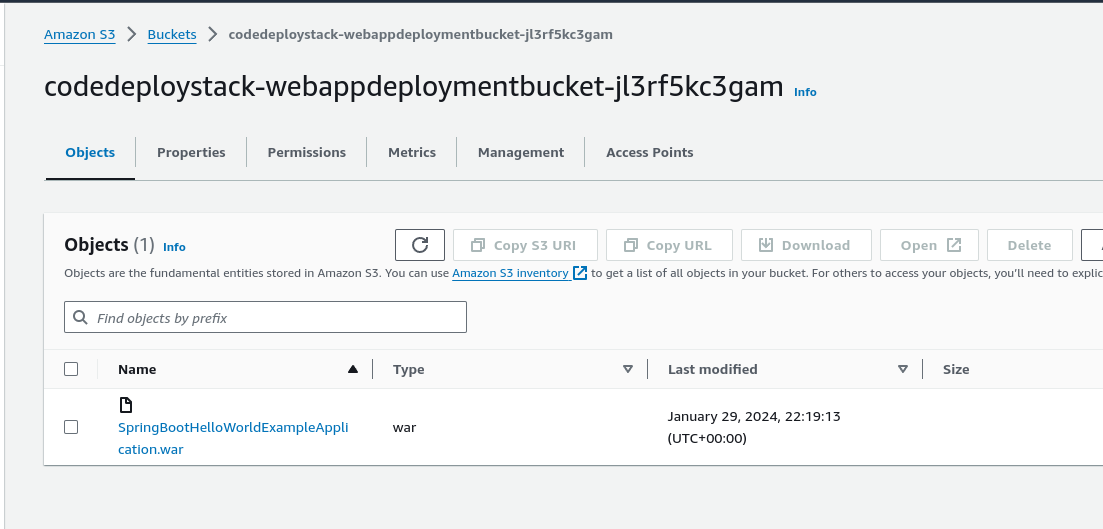
Verify the Deployment in the CodeDeploy console
Lastly we want to now check our code is deployed. There’s two ways to get the URL the first is from EC2 > Load Balancers. Select the Load Balancer and then click on details and use the DNS name URL. Note you may have to add http:// to the front of this URL for it to function correctly. The second method is to go to CloudFormation and click on the WebappUrl
SUCCESS! Our Application is Deployed!

Don’t forget to cleanup your resources after trying out this demonstration
Clean up
To avoid incurring future changes, you should clean up the resources that you created.
- Empty the Amazon S3 bucket:
- Delete the CloudFormation stack (CodeDeployStack) from the AWS console.
- Delete the GitHub Secret (‘IAMROLE_GITHUB’)
- Go to the repository settings on GitHub Page.
- Select Secrets under Actions.
- Select IAMROLE_GITHUB, and delete it.
Summary
This shows the power of resource allocation via a CloudFormation template, in many ways this indicates the power of Cloud computing in its agility to rapidly create a working infrastructure in mere minutes. Something that would be pretty much impossible in an on premises data centre. Once the architecture is designed for our workload we can rapidly automate provision of resources. The compute, networking, S3 Buckets, Load Balancer,
What else could we do with this project? That depends if we decide to keep the architecture as it is or change it. So for example if the current architecture works for us and we’re happy with it. We could look at automated backups for our code as it has been pushed to AWS. It is held on GitHub and in an S3 Bucket but we could use AWS Backup to automate backups for further protection of our code resources.
Using AWS Backup for Amazon S3
https://docs.aws.amazon.com/AmazonS3/latest/userguide/backup-for-s3.html
Maybe we prefer a serverless architecture instead of using EC2 instances. So we could look to AWS Amplify to deploy our website as an alternative solution.
Complete guide to full-stack CI/CD workflows with AWS Amplify
https://aws.amazon.com/blogs/mobile/complete-guide-to-full-stack-ci-cd-workflows-with-aws-amplify/
The decision here is how much configuration we require. If we require detailed self management then employing the solution in this project is very effective. Otherwise we can look at solving hosting our website with AWS Amplify instead as it offers a fully managed CI/CD and hosting service so that we have a zero-config deployment.